I finally have my new blog up and running. Well still a few things i'm working out, but I won't be posting here anymore but over there. Please follow me over there ok? Thanks for looking and spending time with me!
God's Blessings
Pink Ladybug Scrapper
my address is still bowsandblessings.blogspot.com
November 23, 2009
November 19, 2009
I found this link to a tri-fold card using the cricut and instructions with the scores. Here you go: http://cuttingabove.blogspot.com/2009/09/chicken-soup-using-from-my-kitchen.html
November 14, 2009
Mickey & Friends Scrapbook
Ok, I'm in the process of trying to put together a scrapbook for my niece. She just got back home from Disney and is so exicted! So I am gathering some ideas for her layouts here. Take a look, you may need them one day too!
Here are some helpful links I found online at a Disney thread:
TIPS:
The ABC's of Disney: For those interested in doing an ABC scrapbook or anything else..
http://disboards.com/showthread.php?t=1457364
EPCOT MICKEY HEADS: http://disboards.com/showthread.php?t=2249886
TUTORIAL:
Kitting pages together: http://disboards.com/showthread.php?...4#post29558134
Handmade paper Piecings via computer: http://disboards.com/showthread.php?t=2101213
TECHNIQUES 101:
**Make your OWN glue dots: http://www.disboards.com/showthread.php?t=1995424
Die Cut Layering: http://www.disboards.com/showthread.php?t=1336450
Shaker Boxes: http://www.disboards.com/showthread.php?t=1338040
Slide Mounts: http://www.disboards.com/showthread....5#post19551155
Clipboards: http://www.disboards.com/showthread.php?t=1575346
Paper Piecings: http://www.disboards.com/showthread.php?t=1717981
PROJECTS (instructions included):
Altered ClipBoards: http://www.disboards.com/showthread.php?t=1497522
Paper Bag Album: http://www.disboards.com/showthread.php?t=1435425
Exploding Box: http://www.disboards.com/showthread.php?t=1517639
Star Mini-Book: http://disboards.com/showthread.php?t=2278797
God given dreams
Today’s Verse: “A man’s mind plans his way, but the Lord directs his steps and makes them sure” (Proverbs 16:9, AMP).
Today’s Word:
Oftentimes as children, we have dreams of the future. Dreams of being ball players and actresses, super heroes, and firemen. But most of the time, they end up just being wishful thinking. As we get older, we grow out of them. It’s good to play and have dreams as children, but when we grow up, we have to know the difference between a God-given dream and a wish. I remember when I was a little boy, I dreamed of playing basketball for the Houston Rockets. That was definitely a fantasy!
But we all have dreams placed inside of us by the Creator of the Universe. In fact, the Latin word for “desire” means “from the Father.” You can tell if a dream is really from God if that desire won’t go away. You may have had it for years, and you still can’t let it go. In fact, you may have tried to let it go, but it won’t let go of you.
I encourage you to search your heart today and allow those God-given dreams to surface. He placed those desires inside of you for a purpose, and He’s going to use them to direct you into the destiny He has in store for you!
Prayer for Today: Father in heaven, thank You for the dreams and desires You’ve placed within me. I submit those dreams to You and ask that You direct my steps. Search my heart and make my thoughts agreeable to Your Word and to Your plan. In Jesus’ Name. Amen.
I found this online. It's so timly for my situation.
November 9, 2009

Freezer T-Shirt Instructions
FREEZER T-SHIRT/ TOTE INSTRUCTIONS:
ITEMS YOU NEED:
Tote or T-Shirt
Iron – Mine is set on cotton setting
Tulip Fabric Paint
Freezer Paper – Found at Walmart near foil
Paint Brushs
Cricut – To cut out Stencil
1. Wash you tote/t-shirt and dry.
2. Iron out your tote/t-shirt so there are no creases where your image is going.
3. Select the image you want, size that you want, and cut in the middle of your freezer paper using your cricut. Make sure your FLIP button is on and the shinny side of the paper is up.
4. Take you stencil off your mat. Flip stencil over so shinny side is on tote/t—shirt.
5. Iron stencil on until all edges are secure to prevent paint leaking underneath. Make sure to add your little details that were cut out of your image. (strawberry seeds, eyes, etc, and iron them on too.)
6. Place an extra sheet of freezer paper or cardboard inside the shirt so that no paint leaks through. I DID NOT do this with the tote bag as the material was thick but you can.
7. Pour paint on brush or plate and paint. Let it dry at least 4 hours before applying a second coat.
8. When tote/t-shirt is all done let it sit for 72 hours.
9. After 72 hours wash inside out and dry. If it needs to be ironed I ironed mine while inside out.
November 8, 2009
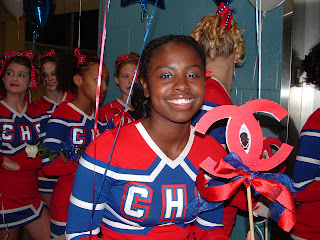
Sisters Forever! Cheerleading 101
These are my Jewels! These pics wer taken at the cheerleading competition at James Monroe High School. They had such a great time! It really was quite fun.


Subscribe to:
Posts (Atom)