I finally have my new blog up and running. Well still a few things i'm working out, but I won't be posting here anymore but over there. Please follow me over there ok? Thanks for looking and spending time with me!
God's Blessings
Pink Ladybug Scrapper
my address is still bowsandblessings.blogspot.com
November 23, 2009
November 19, 2009
I found this link to a tri-fold card using the cricut and instructions with the scores. Here you go: http://cuttingabove.blogspot.com/2009/09/chicken-soup-using-from-my-kitchen.html
November 14, 2009
Mickey & Friends Scrapbook
Ok, I'm in the process of trying to put together a scrapbook for my niece. She just got back home from Disney and is so exicted! So I am gathering some ideas for her layouts here. Take a look, you may need them one day too!
Here are some helpful links I found online at a Disney thread:
TIPS:
The ABC's of Disney: For those interested in doing an ABC scrapbook or anything else..
http://disboards.com/showthread.php?t=1457364
EPCOT MICKEY HEADS: http://disboards.com/showthread.php?t=2249886
TUTORIAL:
Kitting pages together: http://disboards.com/showthread.php?...4#post29558134
Handmade paper Piecings via computer: http://disboards.com/showthread.php?t=2101213
TECHNIQUES 101:
**Make your OWN glue dots: http://www.disboards.com/showthread.php?t=1995424
Die Cut Layering: http://www.disboards.com/showthread.php?t=1336450
Shaker Boxes: http://www.disboards.com/showthread.php?t=1338040
Slide Mounts: http://www.disboards.com/showthread....5#post19551155
Clipboards: http://www.disboards.com/showthread.php?t=1575346
Paper Piecings: http://www.disboards.com/showthread.php?t=1717981
PROJECTS (instructions included):
Altered ClipBoards: http://www.disboards.com/showthread.php?t=1497522
Paper Bag Album: http://www.disboards.com/showthread.php?t=1435425
Exploding Box: http://www.disboards.com/showthread.php?t=1517639
Star Mini-Book: http://disboards.com/showthread.php?t=2278797
God given dreams
Today’s Verse: “A man’s mind plans his way, but the Lord directs his steps and makes them sure” (Proverbs 16:9, AMP).
Today’s Word:
Oftentimes as children, we have dreams of the future. Dreams of being ball players and actresses, super heroes, and firemen. But most of the time, they end up just being wishful thinking. As we get older, we grow out of them. It’s good to play and have dreams as children, but when we grow up, we have to know the difference between a God-given dream and a wish. I remember when I was a little boy, I dreamed of playing basketball for the Houston Rockets. That was definitely a fantasy!
But we all have dreams placed inside of us by the Creator of the Universe. In fact, the Latin word for “desire” means “from the Father.” You can tell if a dream is really from God if that desire won’t go away. You may have had it for years, and you still can’t let it go. In fact, you may have tried to let it go, but it won’t let go of you.
I encourage you to search your heart today and allow those God-given dreams to surface. He placed those desires inside of you for a purpose, and He’s going to use them to direct you into the destiny He has in store for you!
Prayer for Today: Father in heaven, thank You for the dreams and desires You’ve placed within me. I submit those dreams to You and ask that You direct my steps. Search my heart and make my thoughts agreeable to Your Word and to Your plan. In Jesus’ Name. Amen.
I found this online. It's so timly for my situation.
November 9, 2009

Freezer T-Shirt Instructions
FREEZER T-SHIRT/ TOTE INSTRUCTIONS:
ITEMS YOU NEED:
Tote or T-Shirt
Iron – Mine is set on cotton setting
Tulip Fabric Paint
Freezer Paper – Found at Walmart near foil
Paint Brushs
Cricut – To cut out Stencil
1. Wash you tote/t-shirt and dry.
2. Iron out your tote/t-shirt so there are no creases where your image is going.
3. Select the image you want, size that you want, and cut in the middle of your freezer paper using your cricut. Make sure your FLIP button is on and the shinny side of the paper is up.
4. Take you stencil off your mat. Flip stencil over so shinny side is on tote/t—shirt.
5. Iron stencil on until all edges are secure to prevent paint leaking underneath. Make sure to add your little details that were cut out of your image. (strawberry seeds, eyes, etc, and iron them on too.)
6. Place an extra sheet of freezer paper or cardboard inside the shirt so that no paint leaks through. I DID NOT do this with the tote bag as the material was thick but you can.
7. Pour paint on brush or plate and paint. Let it dry at least 4 hours before applying a second coat.
8. When tote/t-shirt is all done let it sit for 72 hours.
9. After 72 hours wash inside out and dry. If it needs to be ironed I ironed mine while inside out.
November 8, 2009
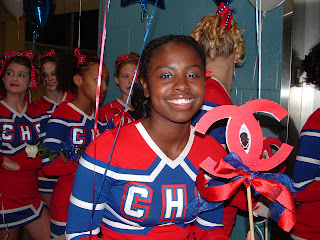
Sisters Forever! Cheerleading 101
These are my Jewels! These pics wer taken at the cheerleading competition at James Monroe High School. They had such a great time! It really was quite fun.


Blog Candy Suprise!! From Crafty Chatter's Blog!

Follow this link to be entered for some blog candy! I sure did. It's my first time actually getting excited that I might win! Oooh, I hope so. But anyway here is the link:
http://www.craftychatter.com/2009/10/surprise-blog-candy-giveaway.html
November 7, 2009
Doesn't this look delish!!
So, I guess I'm kinda hungry right now. We just got back from Cheerleading Competition. My girls (Caroline High School) came in 5th. You had to place 1-4th!! Aaaah! We just missed it! Like I was actually cheering! But I was! I was on the sideline.
Anyway, I'm off to find a recipe for these beautiful cookies. Thanksgiving is coming up and I want to make sure all my recipes are in order. Gosh they look great!

Anyway, I'm off to find a recipe for these beautiful cookies. Thanksgiving is coming up and I want to make sure all my recipes are in order. Gosh they look great!

November 4, 2009
My first try!!

This is my first try at a tag. I made it big so I could get my thoughts together. But anyway here it is.... Hope you like it! :O)
Freedom of the Seas
Here is the ship that we will be on in about 30+- a few days! I can't wait! We've been waiting for so long to go on this trip!
 Bon Voyage!!
Yummy Goodie Bags!!


 Goodie bags! I love goodie bags. I found these online and I can't wait to try them. Aren't they cute.
How To: Goodie Bag
I found this on onlie, but the tutorial is in the link. I love this goodie bag. I think I'm going to try and make it for our marriage ministry next Friday.

www.splitcoaststampers.com/resources/tutorials/boxinabag/

www.splitcoaststampers.com/resources/tutorials/boxinabag/


November 3, 2009
Some of my Projects:
These are some of hte things I've been working on. Hope you like. The last two shots are a layout I'm doing for our vacation.


How to Do A Iron on Transfer
I found this todo online. I'll post a pic. as soon as I can.
Supplies Needed: CriCut Design (Any cartridge), Color Fabric preferably light weight cotton, HeatnBond Ultra Adhesive, glitter t-shirt paint, spray glitter, and an Iron.
1. Cut your fabric to the desired size for your design.
2. Iron the Ultra bond onto the back side of the fabric as directed on the packaging. Let the fabric cool before continuing.
3. Peel away the protective wax paper, and save (it can be used to protect fabric from scorching in a future step).
4. Place the fabric onto a cutting mat. Be careful to make sure the fabric is smooth, and there are no bubbles or wrinkles. I used a clean brayer to roll over the fabric to insure it's smoothness.
5. Cut your pattern as you would if it were paper.
6. Place the design on your project, and replace the wax paper over the top of your design, and Iron it onto your project.
7. I sewed ribbon down the right side.
8. The Pennant was cut from a piece of stiff felt.
9. The stars were ready-made fun foam glitter covered stars.
10. The pom poms were created from fuzzy yarn.
11. The Megaphone was cut from red fabric by hand using a template.
Cropping With My Friends
Just a little note for today. I'm at the Library taking a break. But I'm cropping all day with my friends! :O)
November 2, 2009
The Cheer Competition
Well today is the 2nd day of Nov. and I've finally got my blog back up and running. Oh, it's so nice to have a place called home! Pink Bows & Blessings. My new blogspot!
Please feel free to browse around, it's most of my old stuff with some new pictures and posts thrown in. I'll be back tomorrow with some more pics.
My daughter won her state cheeleading competition and she's still on cloud 9. Here she is:

Please feel free to browse around, it's most of my old stuff with some new pictures and posts thrown in. I'll be back tomorrow with some more pics.
My daughter won her state cheeleading competition and she's still on cloud 9. Here she is:

She's the one on the LEFT. Such a sweetie. Those are her cheerfriends.
Goodie Bag! I love Goodie Bags!
 Card found online with some interesting stuff:
Instead of folding it into a card, score this with two more lines at the bottom and turn it into a treat bag.
2. Cut a circle out of the front of the card.
3. Add a frame with black cardstock and an acetate window.
4. Use a black marker and colored some regular paper reinforcements for the eyelits.
Cricut Cart. Storage Complete


This is the project that I'm working on tomorrow. I'm getting this done once and for all! Here are just a few shots and the directions:
The dividers are made of Plastic Canvas. Plastic Canvas comes in a 6 pack of 10.5×13.5 mats at WM for $1.97.
The cut directions are:
7 strips of 59×10 (# of holes)
Cut 5 deep @ 12, 24, 36, 48
4 strips of 39×10 (#of holes)
Cut 6 deep @ 5, 10, 15, 20, 25, 30 & 35
59×10: You should see 59 rows by 10 rows so you’re
cutting at 60 and 11. The same for 39×10.


How to Tie A Ribbon Again
Found this awesome tutorial on How to tie a ribbon! Hope it helps someone!
You will need a ribbon and hole puncher

2. Punch 2 wholes side by side in your project.

3. put the ribbon through each of the holes

4. Turn your project over on the back and tie the ribbon.

5. pull the ribbon back trhough the same holes to the front of the project.

6. Pull the ribbon to each side FLAT!

7. Take your scissors and trim off the ends of the ribbon.

You will need a ribbon and hole puncher
2. Punch 2 wholes side by side in your project.
3. put the ribbon through each of the holes
4. Turn your project over on the back and tie the ribbon.
5. pull the ribbon back trhough the same holes to the front of the project.
6. Pull the ribbon to each side FLAT!
7. Take your scissors and trim off the ends of the ribbon.
November 1, 2009
Sweet Treats!

 Don't they look delish? This is my other (wishlist) hobbie. I found these cute ideas online. My husband says I can only have one hobbie at a time. :O)

Cuttlebug Sandwiches
I'm definately going to put this in my Cricut Binder: Cuttlebug Sandwiches
Important Sandwiching Notes:
· Always err on the THIN side; you can pass the sandwich through the machine again, but if you start out too thick, you can potentially break a plate or otherwise hurt your new ‘bug!
· If a cardstock or chipboard shim is noted, always try the sandwich without first, then add cut-to-size (the size of the plates) cardstock or chipboard layers until the appropriate thickness of the sandwich is determined.
· Based on feedback, the space inside the Cuttlebugs differ from machine to machine, so be SURE to error on the THIN-STACK side!
Cardstock
Chipboard
Magnetic/ Metal Sheets & Thin cork (Media)
Cuttlebug Dies
Plate “A”, Plate “B”, Die (cutting side up), Cardstock, Plate “B”
Plate “A”, Plate “B”, Die (cutting side up), Chipboard, Plate “B”
Plate “A”, Plate “B”, die (cutting side up), Media, Plate “B”
Cuttlebug Embossing Folders
Plate “A”, Plate “B”, Folder (with cardstock inside), Plate “B”
Plate “A”, Plate “B”, Folder (with chipboard inside), Plate “B”
Plate “A”, Plate “B”, Folder (with metal sheet inside), Plate “B”
Nestabilities
You will need Spellbinders Tan Embossing Mat to emboss in
Cuttlebug™ machine (or a plumbers gasket cut to size, or some use a mouse pad)
Cutting Sandwich - (Stack from bottom up)
1. A plate
2. C plate
3. Spellbinders Die (cutting side up) that means the side with the
ridges
4. paper or cardstock
5. B plate
6. Run through Cuttlebug™ machine.
Embossing Sandwich- (Stack from bottom up)
*Remove C Plate for embossing sandwich
1. Place A plate on bottom
2. Leave die face up on A plate with die cut still in the die.
3. Place one Spellbinders Tan Embossing Mat on top of the die.
4. Use 2 or 3 pieces of cardstock to shim.
*Cautionary Note: Using more than 3 pieces of cardstock to
shim Cuttlebug Embossing sandwich will result in B Plate
breakage. When using Spellbinders Edgeabilities card making
dies, shim with only 2 pieces of card stock.
5. Place two acrylic B plates on top of sandwich and run thru
Cuttlebug machine to emboss Spellbinders die cuts.
6. Turn die over and use like a stencil with inks and chalks for
added detail.
BigShot Embossing Folders
Plate “A”, Plate “B”, Folder (with cardstock inside), Plate “B”, Cardstock shim
BigShot Large Dies
Plate “B”, Cardstock, Die (cutting side down), Plate “B”
Revolution Dies
Plate “A”, Plate “C”, Die, Cardstock, Plate “B”
Sizzlit Dies
Plate “A”, Plate “B”, Die (cutting side up), Cardstock, Plate “B”
Note: Provocraft suggests using Plate” C” instead of the second Plate “B”, however, CB owners have cracked plates, so try with two “B” plates first.
Sizzix Original Dies & other Steel Rule Dies
Plate “B”, Cardstock, Die (cutting side down), Plate “B”
Plate “B”, Chipboard, Die (cutting side down), Plate “B”
Sizzix CutNFold Dies
Plate “A”, Die, Cardstock, Plate “B”, Chipboard shim
Also try:
Plate “B”, Cardstock, Die, Chipboard shim (maybe 6 layers)
Sizzix Embossing Folders aka Simple Impressions
Plate “A”, Plate “B”, Folder (with cardstock inside), Plate “B”
Also try:
Plate “A”, Chipboard shims, Folder (with cardstock inside), Plate “B”
QuicKuts Dies (Regular)
Plate “A”, Plate “B”, Die, Cardstock, Plate “C”
Plate “A”, Plate “C”, Die (cutting side up), Chipboard, Cardstock shim, Plate “B”
QuicKuts Dies (Grand)
Plate “A”, Plate “B”, Die, Cardstock, Plate “C”
Brass Embossing Stencils
Plate “A”, Plate “B”, , Brass stencil ,paper/cardstock,mouse pad (cut to size, rubber side down), Plate “B”
Sandwich may need to pass through several times based on cardstock thickness
Or use plumber’s black rubber plus red rubber gasket, instead of mouse, then add last plate B.
Big Impressions Texture Plates
Plate “A”, BI texture Plate, Cardstock, Silicone Rubber pad (from BISK), Impressions Pad (from BISK)
*BISK-Big Impressions Starter Kit
Fiskars Texture Plates
Plate “A”, Fiskars texture Plate, Cardstock, tan Wizard pad, black or tan Wizard pad, (possible Cardstock shim,) Plate “B”
Also try:
Plate “A”, Fiskars texture Plate, Cardstock (lightly misted with water), 2 layers Fun Foam, Chipboard Shim, Plate “C”
Also try:
Plate “A”, Fiskars texture Plate, Cardstock (right side towards TP), Rubber Plate (made from Plumber’s rubber gasket), Plate “C”
Plastic thin stencils
Plate “A”, Plate “B”, , Brass stencil ,paper/cardstock,mouse pad (cut to size, rubber side down), Plate “B”
Here too- may try
Plate “A”, Plate “B”, , plastic stencil, ccrdstock, black rubber, red rubber, plate B
Subscribe to:
Posts (Atom)


